Previously in this series, we installed the ModelGlue:Unity framework and the ColdSpring framework. We used the ModelGlueApplicationTemplate as the skeleton for our new Contact-O-Matic 1.0 alpha (don’t worry, we’ll eventually make this a Web 2.0 application). We rejoiced when we ran our application and now will look at some essential information about our new set-up.
Let’s begin with opening the Application.cfm file and giving our application a name. Set the name attribute of the application tag to ‘ContactManagerMG’. If for some reason, you already have another application on your server with the name of ContactManagerMG, put another name here.
Next, as ModelGlue uses ColdSpring for configuration, let us look at some key sections of the framework config. Open the *ContactManagerMG/config/ColdSpring.xml file in your editor. There are two beans defined by default, one with the id of ‘modelGlueConfiguration’ and one with the id of ‘reactorConfiguration’. The ‘reactorConfiguration’ bean is for yet another framework you could use with ModelGlue. We won’t need the ‘reactorConfiguration’ for this series and you may delete that bean from your ColdSpring.xml file.
Ok, now look closer at the ‘modelGlueConfiguration’. The property tags define how your application will behave.
The ModelGlue framework components are set and retrieved in the application scope. The framework handles this for you automatically and where historically you might have actively placed shared components and global variables into the application scope, we count on ModelGlue (and ColdSpring) to manage this for us.
For the moment, we are interested in the first four property tags; reload, rescaffold, debug and defaultEvent.
Reload tag
- When set to ‘true’ will recreate our application from scratch every time and when set to the value of ‘false’ will run with cached objects. When developing, we will be creating and modifying a lot of the files that would be cached so we want them to be recreated each time we run a request.
Set the reload tag to the value of ‘true’.
Rescaffold tag
- Ignore for the purposes of this section.
Debug tag
- When set to ‘true’, the framework will include a set of messages about the internal actions and flow of the application. This can be set to verbose, true or false.
Set the debug tag to the value of ‘true’
DefaultEvent tag
- This tag sets the name of the default event. In other words, if a request comes in without a specific event, this is the event that will run. The value straight out of the box is page.index.
Leave the value of defaultEvent set to page.index.
ModelGlue uses a parameter called ‘event’ to trigger certain processes within your application. As defined in the ‘modelGlueConfiguration’ our application has page.index as our default. Open the *ContactManagerMG/config/ModelGlue.xml file and find the event-handler called Page.Index.
<include name="body" template="dspIndex.cfm" />
Note: If you are copying this code, change the “& l t ;” to a proper <.
In this event-handler, there are 3 tag types; broadcasts, results and views.
- The broadcasts tag is currently empty
- The results tag has a child tag of result. This specific result is a command to run the event-handler for ‘view.template’. If you look in the ModelGlue.xml file, you will see where the event-handler ‘view.template’ is defined.
- The views tag has a child of include. In a nutshell, this is a command to run the cfm template called ‘dspIndex.cfm’ and store it in a value called body.
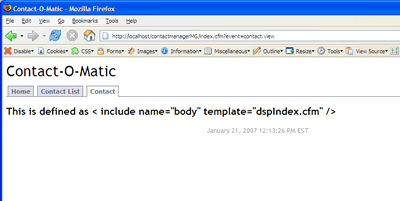
Open the file ‘dspIndex.cfm’ located at *ContactManagerMG/views/dspIndex.cfm.
Look in the *ContactManager/views folder and open the file named dsp.Index.cfm. Inside replace the text that says:
Model-Glue is up and running!
With:
This is defined as <include name="body" template="dspIndex.cfm" />
Now run your application:

So now we see that the contents of the dspIndex.cfm file were inserted between a header and footer in our application. According to the include tag, we have this file set to the name of ‘body’. Let’s go see where body goes and where the rest of the html came from.
Our page.index event-handler also fired off a result of ‘view.template’. Inside the event-handler tag is a different include tag:
<include name="template" template="dspTemplate.cfm" />
Note: If you are copying this code, change the “& l t ;” to a proper <.
The only command is an include tag with the name attribute of ‘template’ and template value of ‘dspTemplate.cfm”. Now open the file named ‘dspTemplate.cfm’ in the *ContactManager/views directory. Inside is the command that pulls body out of ModelGlue
#viewcollection.getView("body")#
Include tags place the content of the template into the viewcollection. The viewcollection holds the name and content of each include tag. Views run in order and you can set one view and pull it out in another just like we did with the body.
Inside ‘dspTemplate.cfm’ make the following changes:- Change the title tag to Contact-O-Matic
- Change the <div id=”banner” tag to Contact-O-Matic
- Change the footer to output the current date and time
Contact-O-Matic
#viewcollection.getView("body")#>
When you run your page again, you can see the beginnings of an application.

In the debugging section, you can also see every process, in the order run by the ModelGlue framework. This is handy insight and for the next few tutorials in the series, I recommend you taking the time to read this information. Understanding how ModelGlue works will save you time when debugging your application.
Now that we understand where all the text on the screen is coming from we shall examine the flow of the application and add a bit of functionality. The framework will run an event called onRequestStart each time a request is processed. There is a message tag defined at the top of the ModelGlue.xml file which maps the function to run on our controller.cfc located at *ContactManager/controller/controller.cfc.
Each function in the controller gets a special scope called the event scope. The event scope is our central location for variables and parameters. The event has several functions available, one of which is ‘getAllValues().’ We will now dump the results of this function to see what the event contains.
When you run your Contact-O-Matic application, you can see the contents of the event scope.
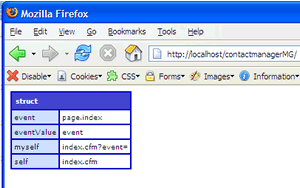
When a request contains URL or FORM parameters, the parameters will be available in the event also. Append ‘?ContactID=1’ in the URL and run the application once again.
http://localhost/contactmanagerMG/?ContactID=1You can see the value for CONTACTID is 1 in the event scope. Remove the dump and abort from onRequestStart and go into your ‘dspIndex.cfm’ file and place the following six lines of code.
	Event: #viewstate.getValue("Event")#


	ContactID: #viewstate.getValue("ContactID")#


	ContactType: #viewstate.getValue("ContactType", "No Contact Type Defined")#

	ContactTypes:#viewstate.getValue("ContactTypes", "There are no contact types defined either")#
Just like the controller has its own special scope (event), the views each have their scope called viewstate. All of the values in the event at the time the view was executed by the framework are in the viewstate. Run the application again.
We have the name of the event being processed (our default event page.index )
We have our ContactID value from the URL.
Additionally, the commands we used for ‘ContactType’ and ‘ContactTypes’ included a default value like so:
viewstate.getValue('NameOfParameter, 'SomeDefaultValue');
We got the default values. This works a lot like a cfparam and if we left off the default values, we would get empty strings for those not previously defined parameters.

Now we have seen parameters go in the event and out of the viewstate. This is how we will pass parameters around in our ModelGlue application. Next we add the navigation and the event-handlers into the template and work on the flow of the Contact-O-Matic.
Open the dspTemplate.cfm once again. You remember this is your global template with the header and footer. It will also contain our navigation.
At the top of the page, pull the values of ‘myself’ and ‘whichMenuIsCurrent’ out of the viewstate.
Next, after the closing banner div tag, add the following lines.
Next, open the ModelGlue.xml file and copy the entire event-handler for page.index and paste it twice. Change the name of the first copy to contact.list and the name of the second to contact.view. Then split the include tag in each event-handler to have a new tag called value. The Value tag defines a simple value that will be available in the viewstate. The name attribute of each value tag will be ‘whichMenuIsCurrent’ and the value of each value tag will be the value to test for in the navigation. When complete, your three event-handlers should look like so:
<include name="body" template="dspIndex.cfm">
<include name="body" template="dspIndex.cfm">
<include name="body" template="dspIndex.cfm">
Note: If you are copying this code, change the “& l t ;” to a proper <.
Then run your application once again and click on each of the navigation links. You should see the value of event change in the URL bar as well as on the screen.
For bonus points, we shall give a little style to our Contact-O-Matic both for looks and to reward our good progress so far. We will turn our navigation into tabs by simply adding a css file from listamatic. Copy the CSS section and place it in a new file at *ContactManagerMG/views/menu.css.
Then reference the new stylesheet from within your ‘dspTemplate.cfm’ file like so:Now run the application once again.
There, now isn’t that lovely? Are we having fun yet?
In the next part of our series, we will add and save contacts with a contact form.Visited 15,474 times, 1 visit(s) today[mc4wp_form id="5878"]