Previously in this series, we installed the ModelGlue:Unity framework and the ColdSpring framework. We used the ModelGlueApplicationTemplate as the skeleton, added our basic flow and navigation. Finally we can save and list contacts Our Contact-O-Matic is moving right along.
In the last segment, we tested the ‘failure’ path and were routed back to the form. We also tested the ‘success’ path and were routed to the contact list. Open the ContactFormBean.cfc located in *ContactManagerMG/Model and edit the validate function (You did check the validate box in the rooibos generator like the last series said, didn’t you 😉 )
Our validate function should have the returntype of boolean. We will pass in a structure to hold any error messages and check the lengths of our two properties ContactName and ContactType. Your validate function should look like this:
Perfect. We have some logic to find out if the entered data is valid. Now we add logic to the controller to only let valid data be saved. If the data is not valid, we will return the user to the form so they can fix it. Open your Controller.cfc located in *ContactManagerMG/controller and find the function named handleContactForm.
As you can see, we currently fill the ContactFormBean using makeEventBean. At that point, all matching values in the event have been loaded. We will validate right after the makeEventBean function. Our validate function takes a struct as an argument so we pass in a new struct. Then based on the return of the validate function, we either add the ‘success’ or the ‘failure’ result.
Before you run your code, be sure to append &init=true in the URL. It is important to remember to clear the ModelGlue scope each time you change the ModelGlue.xml, ColdSpring.xml, any controller functions, or anything stored in ColdSpring.
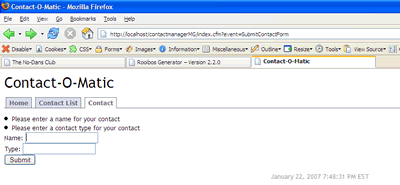
Now when you add a contact, the contact is added to the list. If you submit a blank form, you stay on the form. This works well from a flow point of view but isn’t very user friendly. We have error messages in a struct, lets put them on the screen for the user to see. Note, in the ‘failure’ path of the handleContactForm function, we placed the ErrorStruct in the event. The ‘failure’ result takes us back to the form. Thus, open ‘frmContact.cfm’ located at *ContactManager/Model and pull the ErrorStruct out of the event. We’ll add in a default struct just to make our output cleaner
Then right above the form, check to see if the struct has any values and loop over them on the screen.
Reload your application and try to submit the blank form. Look ma, error messages!

You could make your validation rules as sophisticated as you like. Perhaps checking to make sure the ContactName starts with a ‘D’ or the ContactType is ‘Friend’ as we all know the business rules in an application do change. The nice part about this form of development, is a modification to the validation rules only affects the ContactFormBean. No other files need to be altered to accomplish this. Don’t believe me? Lets give it a try
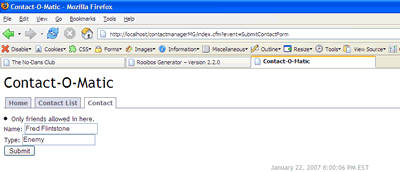
Say our boss comes in and demands only allowing friends into the ContactList. We simply open the ContactFormBean.cfc located at *ContactManagerMG/Model, change the ContactType rule from ‘required’ to ‘friends only’ and add an appropriate message.
Old
New
Reload your application and try to add an enemy.

Change it back to our original ‘required’ rule, save the file and Reload your application once again. Not too shabby eh?
In this series, we learned how and where to validate our form data. We also learned how to route the user based on the results of their request. The Contact-O-Matic is coming along nicely.
