Previously in this series, we installed the ModelGlue:Unity framework and the ColdSpring framework. We used the ModelGlueApplicationTemplate as the skeleton then we added our basic flow and navigation. Our Contact-O-Matic is moving right along.
In this segment of our regularly scheduled programming, we look a bit deeper into ColdSpring, add the contact form and contact list.
Since I’ve filed this series under Rapid Development, we will be using a code generator. Peter Farrell of The Best Darn ColdFusion PodCast Period fame has made available a generator on his website that generates beans, specifically, beans used with forms. While we keep coming across the term ‘bean’ and it keeps signifying different things, in this case a bean refers to a component that models the form fields in a form. The bean has ‘get’ functions and ‘set’ functions corresponding to the values in the form and provides us with a handy container for form submissions.
Visit the Rooibos generator and lets make our first bean. In the first section on the left titled ‘Bean Template’ enter the names and types of the new formfields. For our purposes we will use the following:
ContactID string

ContactName string

ContactType string
Since the bean models form submission content, and we don’t trust form data, each formfield is treated as a string and we’ll do our own checking later on.
Fill out the next fields like so:
Bean Name: ContactFormBean

Path to Bean: ContactManagerMG.model.ContactFormBean

Extends: (Leave blank)

Also, check the options for getMemento() and for validate().Leave everything else unchecked.
Once you have all of the fields filled out as stated above, press the ‘execute’ button. On the right hand pane is the source code of your new ContactFormBean. Copy all of the code and save it in a new file named ‘ContactFormBean.cfc’ located in the *ContactManagerMG.model directory.
Next, we need to add the bean into our ColdSpring.xml file. Open ColdSpring.xml and add the following line after the ‘modelGlueConfiguration’ section.
This configuration provides ColdSpring with the right info so it can make the component when we ask for it. The singleton=’false’ simply means that we want a brand new component when we request this bean, rather than the default ColdSpring behavior, which is to create the component and hold on to it for the life of the application.
Next, in your ModelGlue.xml file, find the event-handler for contact.view then split the ‘broadcasts’ tag to include a new child tag of ‘message’. The message should have a name of ‘needContactForm’
While we are here, also change the template attribute of the view tag to be ‘frmContact.cfm’, we’ll create this new file ‘frmContact.cfm’ in a moment.
<include name="body" template="frmContact.cfm">
Note: If you are copying this code, change the “& l t ;” to a proper <
Then at the top of the ModelGlue.xml file is a section for controllers. Inside the controller tag are several message-listener tags. Add a new message-listener tag with the message attribute of ‘needContactForm’ (same as the message being broadcast in contact.view) and the function attribute of ‘getContactForm’.
Once you have added the new message-listener tag, open the Controller.cfc component located at *ContactManagerMG/controllers directory. Add a new function called ‘getContactForm’ (same name as mapped in the message-listener tag. This function will pull out the ContactFormBean from ColdSpring, use the event.makeEventBean to fill the bean with any matching values from the event scope and finally place it in the event scope.
With me so far?, now create a new file named ‘frmContact.cfm; in the *ContactManagerMG/views directory. Open the newly created ‘frmContact.cfm’ and paste this code:

As you can see, we pull the ‘myself’ and the ‘ContactFormBean’ out of the viewstate and use the ContactFormBean to fill the value attributes on our form fields. We are not accessing either the Form scope nor the URL scope. In place of that, we are looking in only one place for out form values, the ContactManagerBean.
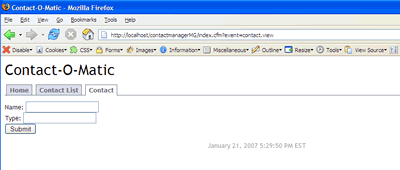
After you save the file, run your application and click on the ‘contact’ tab. You should see your form. If by some chance you have an error, you need to review the last few steps
Now we have a form on the screen which is set to submit to an event called ‘SubmitContactForm’. Lets add the event-handler tag in ModelGlue.xml for the submittal. Open ModelGlue.xml and add a new event-handler with the name of ‘SubmitContactForm’. This event-handler will broadcast a message called ‘contactFormSubmitted’. Additionally, we will define two named results, success and failure so we can account for the application flow.
Then, add the message-listener tag for ‘ContactFormSubmitted’ to the top section of the ModelGlue.xml file
Now create a new function in the controller to handle the contact form. For now, we will add only the ‘failure’ result and work with that flow.
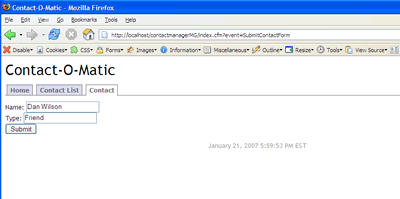
When you run your application, click on the contact tab, fill out the form and submit. You should now have a populated form. This is a typical flow when working with forms. If the form was not submitted correctly, you want to show the form populated with the original values so the user can make the necessary changes.

Still with me so far?
We need a way to save our contacts. We are going to side-step a database for now in order to learn more about ColdSpring. ColdSpring not only creates components for you, it can also add in configuration parameters, other components and a great number of other useful features. Lets look at how we could use ColdSpring to configure an object for us. In this example, we are going to have a ContactService object. For now, the ContactService will store an array of saved contacts and also a collection of Contact Types.
Start by visiting the Rooibos Generator once more and enter in the following configuration information
In the first section on the left titled ‘Bean Template’ enter the names and types of the new formfields. For our purposes we will use the following:
ContactTypes struct

ContactList array
Since the bean models form submission content, and we don’t trust form data, each formfield is treated as a string and we’ll do our own checking later on.
Fill out the next fields like so:
Bean Name: ContactService

Path to Bean: ContactManagerMG.model.ContactService
Extends: (Leave blank)
Leave everything else unchecked.
Once you have all of the fields filled out as stated above, press the ‘execute’ button. On the right hand pane is the source code of your new ContactService component. Copy all of the code and save it in a new file named ‘ContactService.cfc’ located in the *ContactManagerMG.model directory.
Next, we need to add the bean into our ColdSpring.xml file. Open ColdSpring.xml and add the following line after the ‘modelGlueConfiguration’ section.
In ColdSpring terms, a map is a struct and a list is an array. We will use the struct to select the contact type and use the array to hold the saved contacts. Now that our ContactService.cfc is configured in ColdSpring and saved in our *ContactManagerMG.model directory, we need to add the saving mechanism to our handleContactForm function in controller.cfc. In this case, we will change the event.addResult() from ‘failure’ to ‘success’. Edit the function to read as follows:
This new code pulls the ContactService out of ColdSpring, appends the ContactFormBean to the array from ContactService.getContactList() . Next, add a new function to the controller.cfc called ‘getContactList().
This function pulls the ContactService from ColdSpring and adds the ContactList to the event. Next, add a new message-listener tag that maps to this function
Now we will alter the ‘contact.list’ event-handler to broadcast this message. We will also write the display for the contact list and include that as well. Note the ‘template’ attribute of the include tag has been changed to ‘dspContactList.cfm’
<include name="body" template="dspContactList.cfm">
Note: If you are copying this code, change the “& l t ;” to a proper <
Lastly, we create a new .cfm file in the *ContactManagerMG.views directory called ‘dspContactList.cfm’. This will pull the ContactList out of the viewstate scope and loop through with our contacts.
-No Saved Contacts-
| Name | Type |
|---|---|
| #thisContact.getContactName()# | #thisContact.getContactType()# |
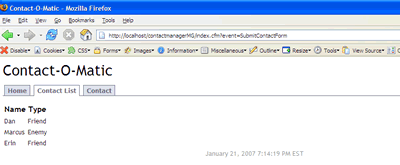
Now run your application and add a contact. Once you submit the contact form, you will see the contact list with your latest submission. Are we having fun yet?
All this works nicely, until you go to another tab then click back on the ContactList. Where did the contacts go?
Since we are running in debug mode, the ModelGlue and ColdSpring objects are recreated on every request. Thus, our saved contact disappears into the ether and we get an empty array. We can persist our contacts by changing the ‘reload’ setting for the modelGlueConfiguration bean in ColdSpring.xml to false. This will maintain the state of our application. Try it now and add a few contacts. Works great!

When you get bored of adding contacts, or patting yourself on the back, switch the ‘reload’ setting back to ‘true’. Then look in the ‘modelGlueConfiguration’ for a the settings called reloadKey and reloadPassword. You will need to add these to the URL in order for the ‘reload’ setting change to take effect. The form is &reloadKey=reloadPassword. Example:
http://localhost/ContactManagerMG/&event=contact.list&init=true
I recommend having a read through the ModelGlue documentation. The docs are extremely well done and are simply packed with great information. If you get stuck on a section in this Series, please leave a comment and I’ll help as much as I can.
By now, you should have an appreciation for what ModelGlue:Unity can do. You should be very impressed by the power of ColdSpring. You should be proud of yourself for making it through these verbose tutorials. In following series, we will add database access, some ajax and some other interesting pieces to our Contact-O-Matic.
